-
Overview of Quote Templates
Quote Templates serve as the fundamental building blocks in the branding and layout for your quotations. In your quote template as you would with word processing software such as Microsoft Word, you can change the Logo, modify the Header and Footer, adjust the Fonts and Colours to create your own unified design for your quotations.
Once you save the Quote Template, you can use the amended template you have just created. Furthermore, the estimate will also be automatically shared with other estimators connected to the Enterprise Server.
-
Getting started with Quote Templates
When working with Quote Templates, it’s crucial to save your progress regularly to avoid losing changes. Be mindful of the Edit this Quote Template button, which can be quite finicky. This button must be enabled while editing Quote Templates at all times. Otherwise, you will be modifying the quotation and not the quote template.
You should also click on the Edit Shared Quotes button each time you navigate to another section of the quotation. This is because each time you navigate to another section of the quote template, the Edit Shared Quotes button will automatically be turned off.
Keyboard Shortcuts
Much like most word processing software, keyboard shortcuts are available to help you format the text on the template as quickly as possible. Below is a table of the most commonly used shortcuts.
Shortcut Description Ctrl + C Copy the selected content to the Clipboard. Ctrl + V Paste the contents of the Clipboard. Ctrl + Shift + V Paste the contents of the clipboard as unformatted text. Ctrl + B Apply bold formatting to text. Ctrl + I Apply italic formatting to text. Ctrl + U Apply underline formatting to text. Ctrl + Z Undo the previous action. Text Editing Tools
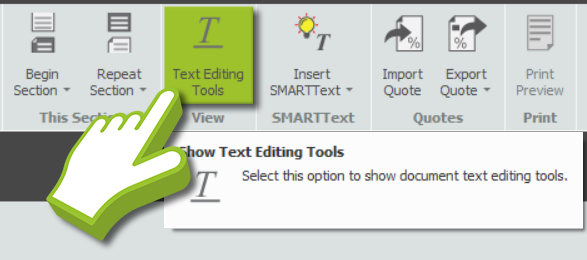
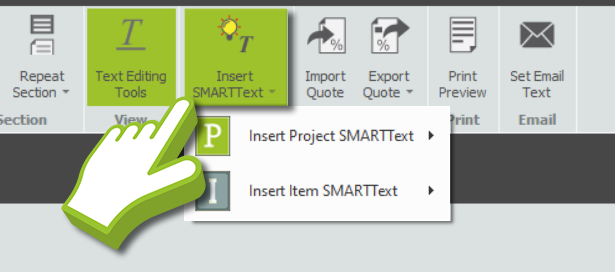
Last but not least, Quote IT also provides formatting tools in a curated toolbar similar to most word processing software. To enable them, click on the Text Editing Tools button. Once you do, a new toolbar will appear below the ribbon with the available formatting tools.
-
Editing the Quote Template
When configuring the quote template, you can easily personalise each section to match your company’s branding. Edit the quote text and insert SMARTText for dynamic details, adjust fonts for readability, update the header, footer, and logo, and configure the tables, etc.
Click the buttons below to learn more about each function:
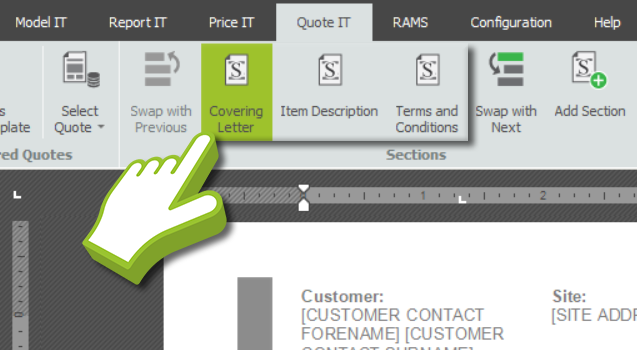
Quote Sections
SMART Estimator uses quote sections to separate the content within the document. This is usually done through a Covering letter, Item Description and Terms & Conditions section. The sections may be added or removed, as well as reordered according to your needs.
If you would like to Learn More about quote sections click here.
Begin Section and Repeat Section
The Begin Section and Repeat Section buttons set whether this section is printed on the next page or not.
-
The Begin Section option affects every section after the first, like the Covering Letter section. If the first option is set, this section will start on a new page. If the second option is set, this section will continue on the same page as the section before it.
-
The Repeat Section option controls sections with item-specific details, like the Item Description section. In Print Preview, these sections repeat for each project item. You can choose to start each repeat on a new page or keep them on the same page for a more compact layout.
If the first option is set, every repeat will start on a new page. If the second option is set, every repeat will continue on the same page.
Configuring the Page Layout
You can customise your document’s layout using the Page Layout options within the Text Editing Tools. You can adjust Margins or set Custom Margins to adjust white space around the page. You can also change the Orientation to portrait or landscape and select the appropriate Size for your document.
Furthermore, you can use Columns to split text into columns. Insert Breaks to separate pages, sections and columns. Add Line Numbers to your sentences (such as your own fixed Terms & Conditions). Finally, you can modify the Page Colour.

Editing the Quote Text and Inserting SMART Text
The quotation can be easily edited by overwriting the existing text or adding new text. To insert dynamic text, make sure that the Text Editing Tools is enabled and then click on the desired location and use the Insert SMARTText drop-down next to the text editing tools. Simply select the SMARTText you need from the sub-menus, and it will be inserted automatically.
For more information about the available SMARTText, click here.
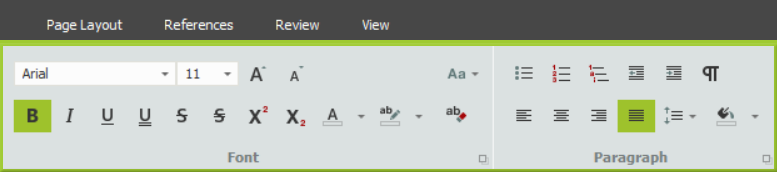
Formatting the font, size and colour
If you would like to edit the formatting of Quote Text and SMARTText with the Text Editing Tools on, then from the Home tab there is a font category. From here you can select the text you wish to format and change the font, desired size and colour to match your branding style. In addition, you can highlight any relevant text, change the case, and clear the formatting.
Additionally, you can also use the paragraph category to adjust the alignment, increase or decrease the indentation, adjust line spacing and finally add bullet points, number lists and multi-level lists.
Modifying the Header & Footer
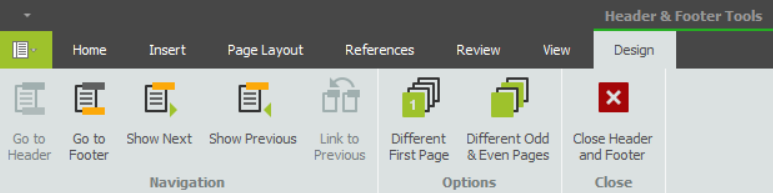
To edit the header or footer, double-click on the top or bottom section of the document. You can switch between the Header & Footer by opening the Header & Footer Tools tab within the Text Editing Tools and select Go to Header or Go to Footer. Once activated, you can customise the content just like any other part of the quote template.
Changing the logo
To change the logo in your quotation, first select the image you want to replace. Using the Text Editing Tools, navigate to the Insert tab and add the image using one of the illustration tools. Choosing an Inline Picture will make the image behave as a text element, while a Regular Picture will function as an image element.

Once inserted, the inserted image replaces the selected one. You can adjust the logo size using the corner controllers and modify its position. Go to the Picture Tools Format tab. From here, you can use the Wrap Text tool and other formatting options to control how the image interacts with the text in your quote template.

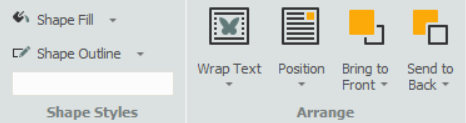
Wrap Text Option Description Square Text wraps around the image in a box-like shape. Tight Text closely follows the edges of the image. Through Text flows through transparent parts of the image. Top and Bottom Text stays above and below the image, not around it. Behind Text Image appears behind the text. In Front of Text Image overlays the text, covering it.
Configuring the Tables Layout & Design
You can modify layout and table design by navigating to Table Tools under Text Editing Tools. These tools allow you to customise your table’s structure, alignment, and appearance. Below are the key tools available in the Table Tools Layout and Table Tools Design tabs.

Revealing Hidden Tables
Most tables in Quote Templates are hidden by default because they are borderless. To make these tables visible while editing, use the View Gridlines tool. Navigate to the Layout tab under Table Tools and click View Gridlines. This will display the hidden table’s structure in a light blue dotted border that’s actually ‘borderless’, making it easier to modify.

Layout Tool Description Select Select an entire table, row, column, or cell. View Gridlines Show or hide table gridlines for easier editing. Properties Access advanced table formatting options. Delete Remove selected rows, columns, or the entire table. Insert Above Add a new row above the current one. Insert Below Add a new row below the current one. Insert Left Add a new column to the left of the current one. Insert Right Add a new column to the right of the current one. Merge Cells Combine multiple selected cells into one. Split Cells Divide a cell into multiple cells. Split Table Separate a table into two at the selected row. Autofit Adjust column width to fit content or window size. Alignment Align text within table cells (left, right, centre). Cell Margins Adjust the space between text and cell borders. 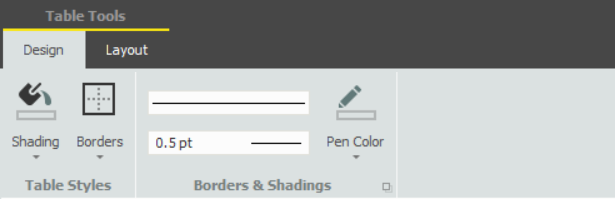
Design Tool Description Shading Apply background colour to selected cells. Borders Add or remove borders around cells or the entire table. Border Style Choose a border line style (solid, dashed, etc.). Border Width Set the thickness of the table borders. Pen Color Select the colour for drawing table borders.
Adding your own Accreditations
To add accreditations to your quotation, follow these steps:

-
Double-click the Footer section of the quotation to begin editing it.
-
If your accreditations are contained in a single image, simply insert the image into the footer.
-
If your accreditations are separate images, insert a table with the same number of cells as the number of accreditations you have. For example, if you have seven accreditations, create a table with seven cells.
-
Next, insert each accreditation image into its respective cell.
-
Finally, adjust the size of each image as needed to ensure they fit neatly within the table and maintain a consistent scale and then under the Table Layout tools, centralise the alignment of the cells.
-
-
Saving your Amendments
Once you’ve made your changes, the final step is to save them. Navigate across the ribbon and click the Save to Shared Quotes (or Save to My Quotes) drop-down button. Then either overwrite an existing quote template or set a new name and add it to the Enterprise Server, doing this will make it instantly accessible to other estimators.