SMART Estimator
-
What is the 3D Viewport?
Before creating 3D models or editing the scaffold, we must first learn how to navigate through the 3D Viewport in order to model and edit effectively. This documentation is split into two parts, Navigating the Scaffold and Editing the Scaffold. You can reach each section by clicking on the respective links.
By changing the camera viewpoint and orientation, SMART Estimator Model IT allows you to curate and visualise digital scaffold projects from any angle. In SMART Estimator Model IT, you have access to various navigation tools in the 3D Viewport. You can explore scaffold projects from different perspectives by zooming, panning, and rotating.
Please read the following before proceeding
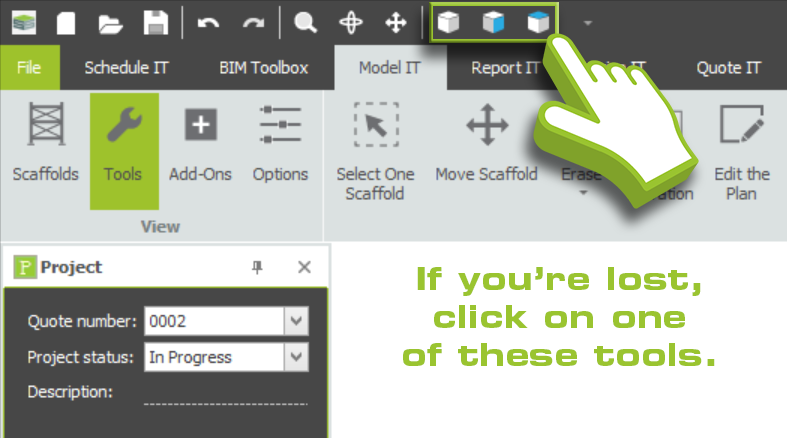
To demonstrate how navigation tools interact with a scaffold, click on the Model IT tab at the top of the window and select the Box button. This will create a box-shaped building surrounded by scaffolding.
Mouse Navigation Tools
In order to navigate efficiently within the 3D Viewport, it is highly recommended to use the mouse navigation tools provided within SMART Estimator.
-
Zooming In / Out
When working with Model IT, you may wish to zoom in to see certain parts of the model in greater detail. You may also wish to zoom out to see the entire scaffold in its entirety.
You can zoom in and out by rolling the Mouse Wheel, you can zoom in by rolling the wheel upwards and zoom out by rolling the wheel downwards.
-
Panning the Display
It is possible to move the view up, down, left and right to see other parts of the model, this is known as panning. To pan the view, hold down the Ctrl key, then click and drag the 3D Viewport with the Right Mouse Button or Middle Mouse Button.
-
Rotating the Display
When using Model IT, it is important to navigate around the scaffold model to apply modifications and changes to the North, East, South, and West sides of the model. In addition, it is important to adjust the scaffold dimensions in a range of ways.
You can rotate the view around the scaffold by clicking and dragging the Right Mouse Button or Middle Mouse Button on the 3D Viewport.
-
Utilising the View Tools
You can activate the View Tools by clicking on any of the ‘View Tools’ icons at the top of the ribbon. Then, by holding down the left mouse button, you will be able to zoom, rotate, or pan the display depending on the tool you select.

There are three ways to exit a view tool once you have finished using it: Double-clicking the Left Mouse Button; Pressing the Esc key or Clicking on the view tool again.
Resetting the Camera Angle
There are quick shortcuts to snap the camera onto an existing scaffold, simply click on any of the 3D View, Front View or Top View butttons along the top of the ribbon to snap your viewpoint to a set camera angle.


-
What is the Red Highlight?
Upon hovering your mouse over the components or parts of your scaffold model, you should notice that they’ll be highlighted in red and a Dialog Box appears next to them. When you drag or set parts or components of your scaffold model, everything that is highlighted in red will move with it.
How to Select all
You can also make changes to all of the lifts above the lift you are highlighting. Press and hold the Shift key while hovering the mouse over the lifts; you will see that all of the lifts above the current one are also selected. This means that any change that you make will be applied to all highlighted lifts.

How to Select one
Moreover, you have the option of isolating the highlights so that any changes you make will affect only one elevation. Press and hold the Ctrl key while hovering the mouse over the lifts; you will notice that the building elevations are only highlighted on one side. As a result, if you make any changes to the highlighted elevation, only that elevation will be affected.

-
Drag and drop functionality
Using the box-shaped scaffolding as an example, you can quickly adjust its width and length. Simply move the mouse pointer to the building elevation, then hold the Left Mouse Button, while moving the mouse. When you are satisfied with the adjustment, release the left mouse button to set the elevation.
Alternative method for dragging and dropping
You can also click on the top of the elevation once and then drag the highlighted building elevation with your mouse cursor to adjust it. Once you’re happy with the adjustment, click on it again to set the elevation.
-
Using the Toolbox dialog
If you wish to have additional precision when adjusting scaffold model components or dimensions, you should use the Toolbox Dialog. This dialog allows you to specify and set exact measurements and make modifications. For example, you can specify whether scaffolding will be present or not or whether a lift will be structural or working.
-
Editing details in the Tooltips
Simply hover over parts of your scaffold model until the Toolbox Dialog appears. Now you can scroll down using the Tab Key. You should notice the highlight moves downwards as part of a cycle, simply focus the highlight on the detail you wish to modify.
Once you’ve made your adjustments, click the Enter key to confirm your changes. Upon doing so, the toolbox will disappear and your adjustments will be applied.
Enter your value by typing it in
Changing your measurements is as simple as hovering your mouse over the component/part of the scaffold you wish to modify. Then, scroll the highlight down to the desired value, and then type it in.
Switching between Checkbox options
If you come across Checkbox options, all you need to do is press the Tab key until the Checkbox option is highlighted. Then, use the 🠄 and 🠆 Arrow Keys to select your option, and then confirm your selection. To confirm your changes, press Tab once more or press the Enter key.
-
Tips for working with the Toolbox Dialog
The Toolbox Dialog and the Red Highlight can be utilised together in tandem. In other words, you can combine the Ctrl and Shift keys when using the Toolbox Dialog. Before pressing Enter to confirm a change on the toolbox dialog, press either of the associated keys to apply changes to all the lifts above or to one elevation.