-
Click on the Import Button
Within the Scaffold section of the Site Tab, there is a Batch import function. This allows the user to import large numbers of scaffolds in one go. This can either be in the form of a CSV file or copied and pasted from Excel into the software.
To start the Import wizard, click on the import icon in the top right corner of the scaffold section.

-
Download the Template
Next choose your preferred method, either import a CSV file or copy and paste from a spreadsheet. At the bottom of this window there is an option to download a template file for the CSV import.

-
Downloading the Template
Upon opening the CSV file, it will appear unformatted. It is recommended that you AutoFit the Column width or Stretch out the Columns to accommodate the input criteria.

-
Filling in the Details


Once you have downloaded and formatted the template correctly, you will need to input the scaffold details under the Top row in accordance with the template’s input criteria. As shown above, each row below the Top row represents an individual scaffold.
Please complete the following template using your preferred spreadsheet program. The template consists of 17 columns, with different input criteria, as shown below:
“Scaffold Name” – Free text input.
“Scaffold Description” – Free text input.
“Area” – Free text input, please note if you type the name of an existing area, it will add the scaffold to it, any area names that don’t exist in the site currently will be created and the scaffold in question assigned.
“Scaffold Type” – This must match an existing scaffold in the scaffold type list in SMART Manager (For SMART Manager lists click here).
“Loading Limit” – This must match an existing loading limit in the loading limit list in SMART Manager (For SMART Manager lists click here).
“Method of Cladding” – This must match an existing method of cladding in the method of cladding list in SMART Manager (For SMART Manager lists click here).
“Method of Tying” – this must match an existing method of tying in the Method of tying list in SMART Manager (For SMART Manager lists click here).
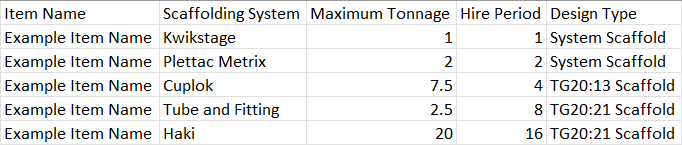
“Quote Number” – Free text entry, the Item Number and Item Name must be filled out for this input to Validate.
“Item Number” – Free text entry, the Quote Number and Item Name must be filled out for this input to Validate.
“Item Name” – Free text entry, the Quote Number and Item Number must be filled out for this input to Validate.
“Scaffolding System” – This must match an existing Scaffolding System in the Scaffolding System list in SMART Manager (For SMART Manager lists click here).
“Maximum Tonnage” – Enter the max amount of tonnage by two decimal places, i.e. “1.50” for 1 ½ tons
“Hire Period” – Enter the number of weeks hire in numbers only, i.e. “4” for 4 weeks.
“Design Type” – This must match an existing design type in the design type list in SMART Manager (For SMART Manager lists click here).
“Next Inspection Date” – Must be displayed in format DD/MM/YYYY or DD.MM.YYYY.
“On Hire Date” – Must be displayed in format DD/MM/YYYY or DD.MM.YYYY.
“Affected by Adverse Weather” – If the scaffold is affected by adverse weather enter “TRUE” or “YES”, otherwise- leave it blank if it is not affected by adverse weather.
-
Choose your Import Method
Next choose your preferred method, either import a CSV file or copy and paste from a spreadsheet.
Click here if you wish to Import the entire .CSV File.
Click here if you wish to Manually Copy & Paste the Dataset.
SMART Manager


-
Save your CSV File
As a first step, save the template as a .CSV file under a filename of your choice. Once the file is saved as a .CSV file, you can import it to SMART Manager.

-
Import the CSV File
Now you can import the newly saved file using the import a CSV option by clicking “browse” and selecting your newly created CSV file. Click next to proceed.

-
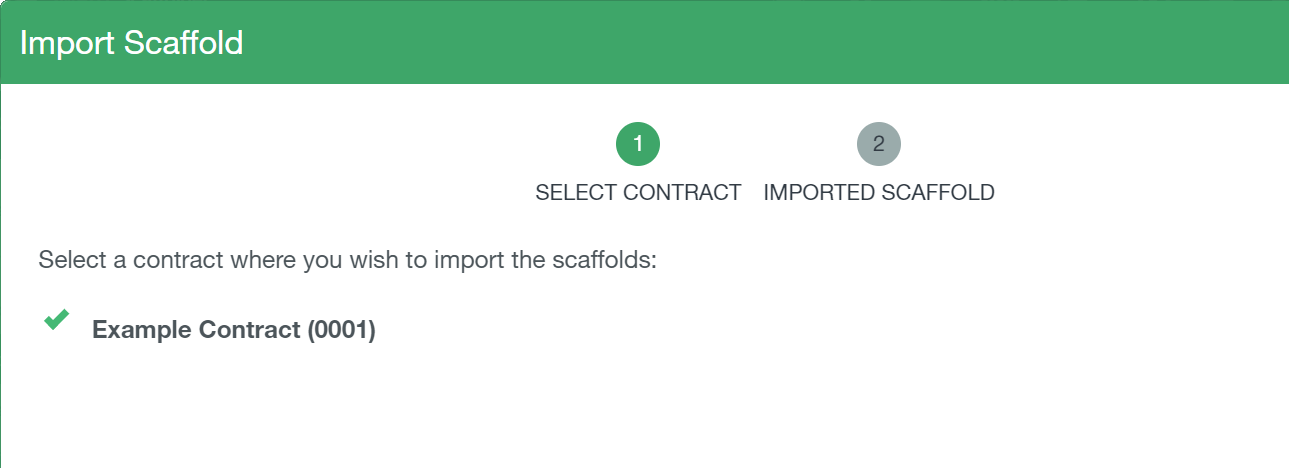
Select Customer Contract
Next select the customer contract you wish to add the scaffolds to and click next.
-
Review and Amend Scaffolds
Finally review the scaffolds due to be imported to the site and correct any invalid cells (highlighted red) and click “✓ Save”. The scaffolds will now be added to the site and will become visible in the Apps to any staff assigned to the site. Please note the sites will be visible only after the user syncs the app.


-
Highlight and Copy
If you prefer you can copy and paste the rows from your newly completed template straight into the batch importer rather than bringing in the CSV. Firstly, highlight the rows you wish to copy, right click and select copy.

-
Type or Paste values from spreadsheet
On the scaffold import wizard click “type or paste values from a spreadsheet”.

-
Select the Contract
Choose the contract you wish to add the scaffolds to.
-
Paste your Scaffold Details
Now select the first row in the import dialog and press Ctrl + V to paste in the copied cells. Or manually add rows and complete the data direct into the table using the “add new row” button.

-
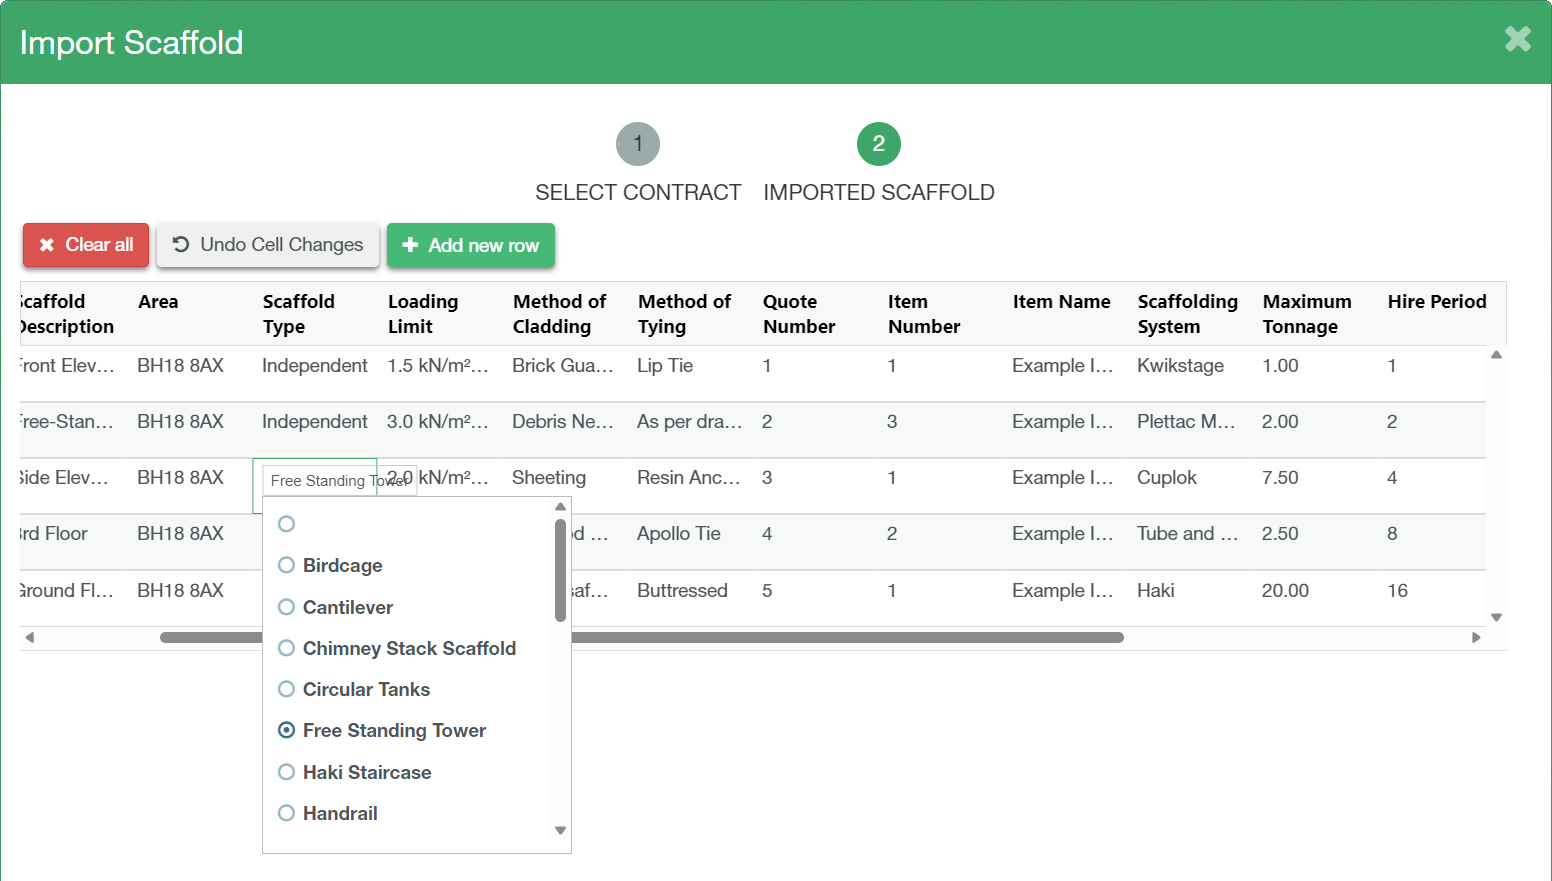
Review and Amend Scaffolds
Any invalid cells will highlight red, you can manually choose the values for these by clicking on the red cell and choosing from the drop-down.
Once completed you can click “✓ Save” and all the scaffolds will be added to the site. These sites will be visible on the App for all staff members assigned to the site next time they sync the App.

